영상처리 이용한 ITS장비 SW개발
개요
큰비젼 황태현 이사 교육 내용
#0 OpenCV 관련 설정
1. contours2.cpp 관련 OpenCV
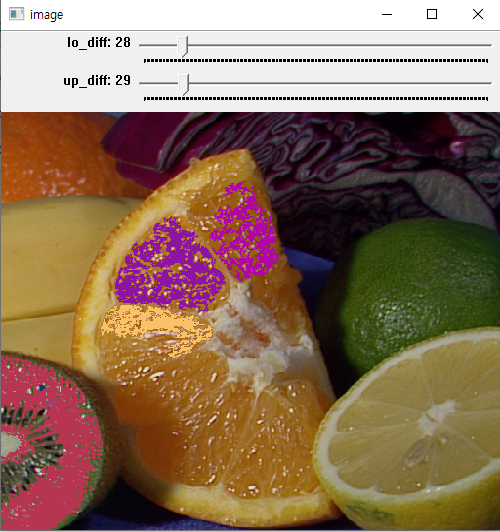
실행 화면
프로그램 설명
floodFill 관련 함수 사용해보자
구성요소와 연결되어있는요소를 채우는것이다
Fills a connected component with the given color.
in case of a grayscale image and floating range src(x′,y′)−loDiff≤src(x,y)≤src(x′,y′)+upDiff in case of a grayscale image and fixed range src(seedPoint.x,seedPoint.y)−loDiff≤src(x,y)≤src(seedPoint.x,seedPoint.y)+upDiff in case of a color image and floating range src(x′,y′)r−loDiffr≤src(x,y)r≤src(x′,y′)r+upDiffr, src(x′,y′)g−loDiffg≤src(x,y)g≤src(x′,y′)g+upDiffg and src(x′,y′)b−loDiffb≤src(x,y)b≤src(x′,y′)b+upDiffb
전체 코드
#include "opencv2/imgproc.hpp"
#include "opencv2/imgcodecs.hpp"
#include "opencv2/videoio.hpp"
#include "opencv2/highgui.hpp"

#include <iostream>

using namespace cv;
using namespace std;

static void help(char** argv)
{
    cout << "\nThis program demonstrated the floodFill() function\n"
            "Call:\n"
        <<  argv[0]
        <<  " [image_name -- Default: fruits.jpg]\n" << endl;

    cout << "Hot keys: \n"
            "\tESC - quit the program\n"
            "\tc - switch color/grayscale mode\n"
            "\tm - switch mask mode\n"
            "\tr - restore the original image\n"
            "\ts - use null-range floodfill\n"
            "\tf - use gradient floodfill with fixed(absolute) range\n"
            "\tg - use gradient floodfill with floating(relative) range\n"
            "\t4 - use 4-connectivity mode\n"
            "\t8 - use 8-connectivity mode\n" << endl;
}

Mat image0, image, gray, mask;
int ffillMode = 1;
int loDiff = 20, upDiff = 20;
int connectivity = 4;
int isColor = true;
bool useMask = false;
int newMaskVal = 255;

static void onMouse( int event, int x, int y, int, void* )
{
    if( event != EVENT_LBUTTONDOWN )
        return;

    Point seed = Point(x,y);
    int lo = ffillMode == 0 ? 0 : loDiff;
    int up = ffillMode == 0 ? 0 : upDiff;
    int flags = connectivity + (newMaskVal << 8) +
                (ffillMode == 1 ? FLOODFILL_FIXED_RANGE : 0);
    int b = (unsigned)theRNG() & 255; //램덤 숫자 가져오기
    int g = (unsigned)theRNG() & 255;
    int r = (unsigned)theRNG() & 255;
    Rect ccomp;

    Scalar newVal = isColor ? Scalar(b, g, r) : Scalar(r*0.299 + g*0.587 + b*0.114);  //램덤값으로 찍을떄 새로운 색 가져오기
    Mat dst = isColor ? image : gray;
    int area;

    if( useMask )
    {
        threshold(mask, mask, 1, 128, THRESH_BINARY);
        area = floodFill(dst, mask, seed, newVal, &ccomp, Scalar(lo, lo, lo),
                  Scalar(up, up, up), flags);
        imshow( "mask", mask );
    }
    else
    {
        area = floodFill(dst, seed, newVal, &ccomp, Scalar(lo, lo, lo),
                  Scalar(up, up, up), flags);
    }

    imshow("image", dst);
    cout << area << " pixels were repainted\n";
}


int main( int argc, char** argv )
{
    cv::CommandLineParser parser (argc, argv,
        "{help h | | show help message}{@image|fruits.jpg| input image}"
    );
    if (parser.has("help"))
    {
        parser.printMessage();
        return 0;
    }
    string filename = parser.get<string>("@image");
    image0 = imread(samples::findFile(filename), 1);

    if( image0.empty() )
    {
        cout << "Image empty\n";
        parser.printMessage();
        return 0;
    }
    help(argv);
    image0.copyTo(image);
    cvtColor(image0, gray, COLOR_BGR2GRAY);
    mask.create(image0.rows+2, image0.cols+2, CV_8UC1);

    namedWindow( "image", 0 );
    createTrackbar( "lo_diff", "image", &loDiff, 255, 0 );
    createTrackbar( "up_diff", "image", &upDiff, 255, 0 );

    setMouseCallback( "image", onMouse, 0 );

    for(;;)
    {
        imshow("image", isColor ? image : gray);

        char c = (char)waitKey(0);
        if( c == 27 )
        {
            cout << "Exiting ...\n";
            break;
        }
        switch( c )
        {
        case 'c':
            if( isColor )
            {
                cout << "Grayscale mode is set\n";
                cvtColor(image0, gray, COLOR_BGR2GRAY);
                mask = Scalar::all(0);
                isColor = false;
            }
            else
            {
                cout << "Color mode is set\n";
                image0.copyTo(image);
                mask = Scalar::all(0);
                isColor = true;
            }
            break;
        case 'm':
            if( useMask )
            {
                destroyWindow( "mask" );
                useMask = false;
            }
            else
            {
                namedWindow( "mask", 0 );
                mask = Scalar::all(0);
                imshow("mask", mask);
                useMask = true;
            }
            break;
        case 'r':
            cout << "Original image is restored\n";
            image0.copyTo(image);
            cvtColor(image, gray, COLOR_BGR2GRAY);
            mask = Scalar::all(0);
            break;
        case 's':
            cout << "Simple floodfill mode is set\n";
            ffillMode = 0;
            break;
        case 'f':
            cout << "Fixed Range floodfill mode is set\n";
            ffillMode = 1;
            break;
        case 'g':
            cout << "Gradient (floating range) floodfill mode is set\n";
            ffillMode = 2;
            break;
        case '4':
            cout << "4-connectivity mode is set\n";
            connectivity = 4;
            break;
        case '8':
            cout << "8-connectivity mode is set\n";
            connectivity = 8;
            break;
        }
    }

    return 0;
}
사용 OpenCV 함수
int floodFill( InputOutputArray image, Point seedPoint, Scalar newVal, CV_OUT Rect* rect = 0, Scalar loDiff = Scalar(), Scalar upDiff = Scalar(), int flags = 4 );
- InputOutputArray image, 입력 이미지
- Point seedPoint, 시작 좌표
- Scalar newVal, 다시 그릴 값
- CV_OUT Rect* rect = 0, Scalar loDiff = Scalar(), 현재 관찰된 픽셀과 구성 요소에 속하는 이웃중 하나 또는 구성요소에 추가되는 시드 픽셀 간의 최대 밝기/색상 차이 (아래로) Scalar upDiff = Scalar(),현재 관찰된 픽셀과 구성 요소에 속하는 이웃중 하나 또는 구성요소에 추가되는 시드 픽셀 간의 최대 밝기/색상 차이 (위로) int flags = 4 (이웃한 갯수 가져오기)
프로그램 설명
    "\tESC - quit the program\n"
    "\tc - 컬러 흑백 전호나
    "\tm - 마스크 모드 "
    "\tr - 원복 복구"
    "\ts -  null-range floodill 사요하기"
    "\tf - use gradient floodfill with fixed(absolute) range\n"
    "\tg - use gradient floodfill with floating(relative) range\n"
    "\t4 - use 4-connectivity mode\n"
    "\t8 - use 8-connectivity mode\n" << endl;
참조 링크
https://docs.opencv.org/4.x/d7/d1b/group__imgproc__misc.html#ga366aae45a6c1289b341d140839f18717
댓글남기기