Image Alignment
Satya Mallick, LearnOpenCV.com
이미지를 템플릿으로 정렬

이론
호모그래피(homography) ― 한 평면을 다른 평면에 투영(projection)시켰을 때 투영된 대응점들 사이에는 일정한 변환관계가 성립하는데 이 변환관계를 호모그래피라 부른다.
- 호모그래피 변환은 임의의 쿼드 를 정사각형으로 변환하는 것이다

이론
- 이미지는 호모그래피로 두개의 연결됩니다.
- 호모그래피를 구하기 위해서는 4개의 대칭점이 필요합니다.
 |
# Imports
import cv2
import numpy as np
import matplotlib.pyplot as plt
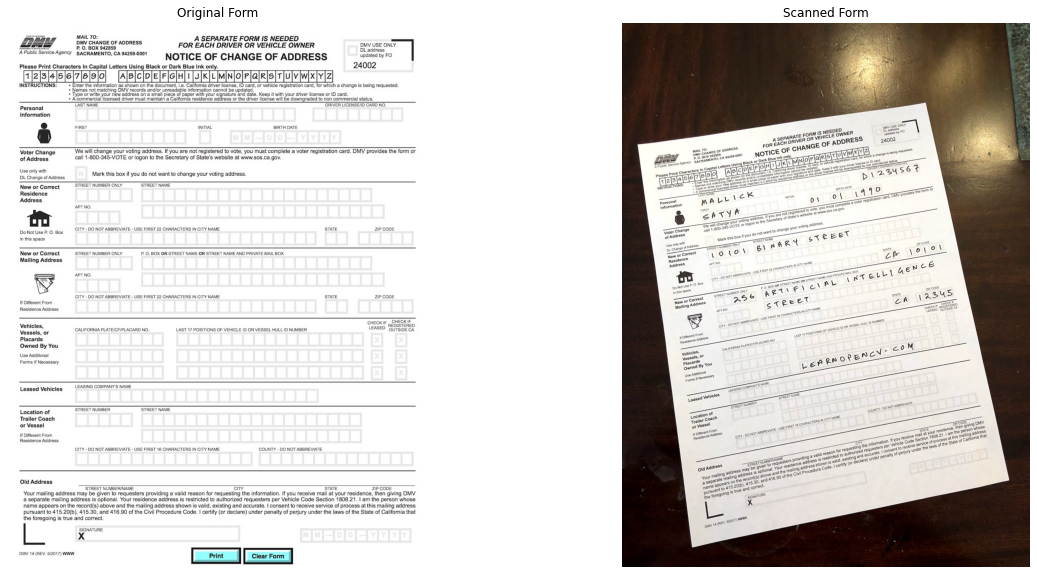
step 1: 템플릿을 읽고 이미지 스캔
#이미지 읽기
refFilename = "form.jpg"
print("Reading reference image : ", refFilename)
im1 = cv2.imread(refFilename, cv2.IMREAD_COLOR)
im1 = cv2.cvtColor(im1, cv2.COLOR_BGR2RGB)


#이미지 읽기
imFilename = "scanned-form.jpg"
print("Reading image to align : ", imFilename)
im2 = cv2.imread(imFilename, cv2.IMREAD_COLOR)
im2 = cv2.cvtColor(im2, cv2.COLOR_BGR2RGB)
Reading reference image :  form.jpg
Reading image to align :  scanned-form.jpg
# Display Images

plt.figure(figsize=[20,10]);
plt.subplot(121); plt.axis('off'); plt.imshow(im1); plt.title("Original Form")
plt.subplot(122); plt.axis('off'); plt.imshow(im2); plt.title("Scanned Form")
Text(0.5, 1.0, 'Scanned Form')
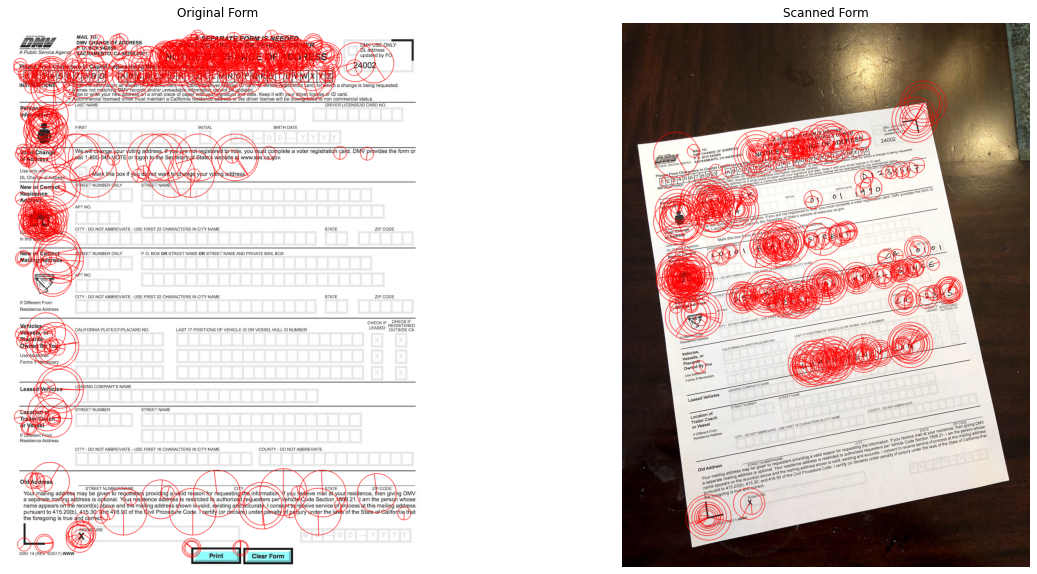
Step 2: Find keypoints in both Images
step 2: 주요 포인트를 찾기
Think of keypoints as corner points that are stable under image transformations 키포인트를 이미지 변환에서 안정적인 이미지 찾기
# 회색 변환
im1_gray = cv2.cvtColor(im1, cv2.COLOR_BGR2GRAY)
im2_gray = cv2.cvtColor(im2, cv2.COLOR_BGR2GRAY)


# ORD 특징 찾기 및 계산

MAX_NUM_FEATURES = 500
orb = cv2.ORB_create(MAX_NUM_FEATURES)
keypoints1, descriptors1 = orb.detectAndCompute(im1_gray, None)
keypoints2, descriptors2 = orb.detectAndCompute(im2_gray, None)

# Display
im1_display = cv2.drawKeypoints(im1, keypoints1, outImage=np.array([]), color=(255, 0, 0), flags=cv2.DRAW_MATCHES_FLAGS_DRAW_RICH_KEYPOINTS)
im2_display = cv2.drawKeypoints(im2, keypoints2, outImage=np.array([]), color=(255, 0, 0), flags=cv2.DRAW_MATCHES_FLAGS_DRAW_RICH_KEYPOINTS)
plt.figure(figsize=[20,10])
plt.subplot(121); plt.axis('off'); plt.imshow(im1_display); plt.title("Original Form");
plt.subplot(122); plt.axis('off'); plt.imshow(im2_display); plt.title("Scanned Form");
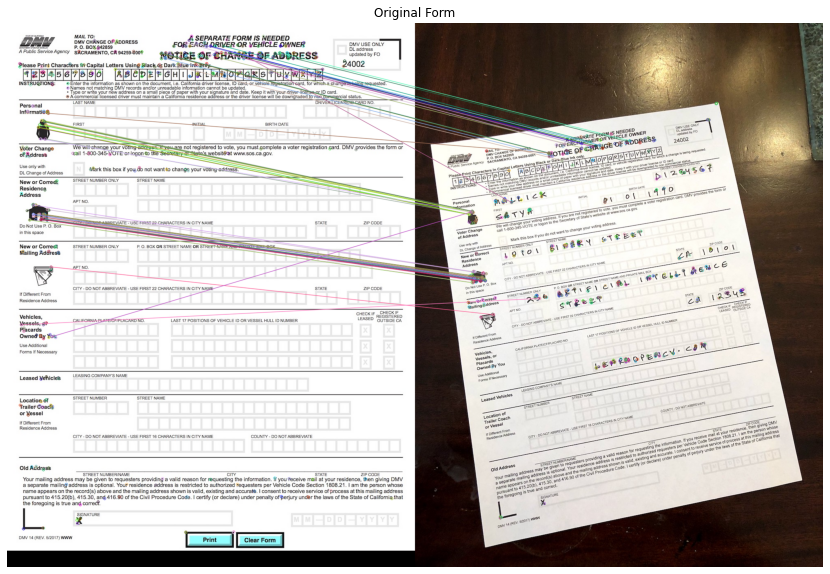
3단계 : 두개의 이미지에서 중요 이미지 찾기
# 특직점 찾기
matcher = cv2.DescriptorMatcher_create(cv2.DESCRIPTOR_MATCHER_BRUTEFORCE_HAMMING)
matches = matcher.match(descriptors1, descriptors2, None)


# 점수로 매칭
matches.sort(key=lambda x: x.distance, reverse=False)


# 낮은값 제거
numGoodMatches = int(len(matches) * 0.1)
matches = matches[:numGoodMatches]
# Draw top matches
im_matches = cv2.drawMatches(im1, keypoints1, im2, keypoints2, matches, None)

plt.figure(figsize=[40,10])
plt.imshow(im_matches); plt.axis('off'); plt.title("Original Form");
step #: 호모그래피 찾기
# 좋은 점 추출
points1 = np.zeros((len(matches), 2), dtype=np.float32)
points2 = np.zeros((len(matches), 2), dtype=np.float32)

for i, match in enumerate(matches):
  points1[i, :] = keypoints1[match.queryIdx].pt
  points2[i, :] = keypoints2[match.trainIdx].pt


# 호모그래피 찾기
h, mask = cv2.findHomography(points2, points1, cv2.RANSAC)
Stop 5: 워프 이미지
# Use homography to warp image
# 워프 이미지를 위해 호모그래피 사용하기
height, width, channels = im1.shape
im2_reg = cv2.warpPerspective(im2, h, (width, height))
# Display results
plt.figure(figsize=[20,10]);
plt.subplot(121); plt.imshow(im1); plt.axis('off'); plt.title("Original Form");
plt.subplot(122); plt.imshow(im2_reg); plt.axis('off'); plt.title("Scanned Form");

참고 자료
https://learnopencv.com/image-alignment-feature-based-using-opencv-c-python/