Pytorch 사용해보기
Pytorch 튜토리얼
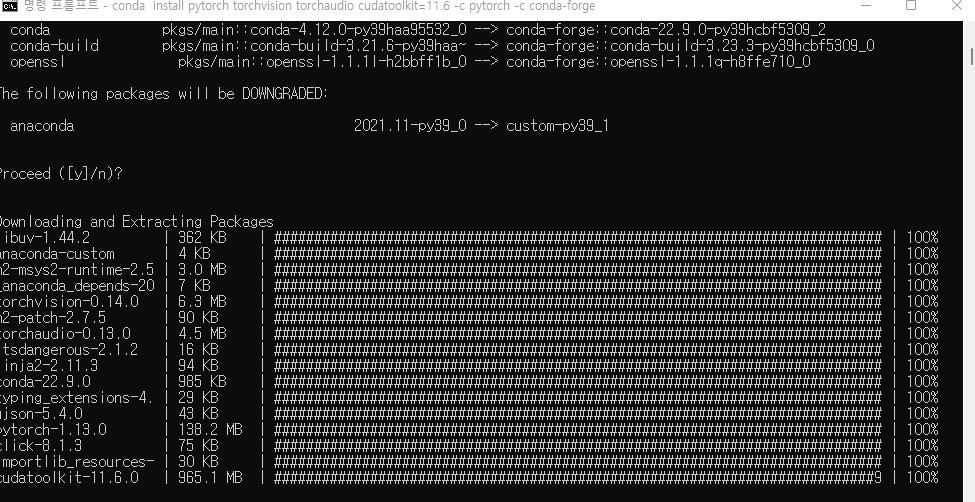
개발 환경 설치
conda install pytorch torchvision torchaudio cudatoolkit=11.6 -c pytorch -c conda-forge
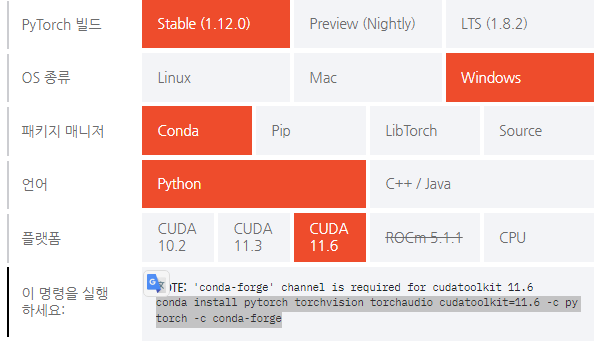 설치 스팩
설치 스팩

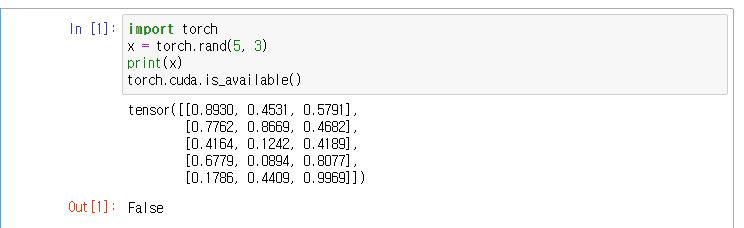
텐서(TENSOR)
텐서는 배열이나 행렬과 매우 유사한 특수한 자료 구조입니다. PyTorch에서는 텐서를 사용하여 모델의 입력과 출력 그리고 모델의 매개변수들을 부호화 합니다.
텐서는 GPU나 다른 하드웨어 가속기에서 실행할 수 있다는 점만 제외하면 Numpy의 ndarray와 유사합니다. 실제로 텐서와 Numpy 배열은 종종 동일한 내부 메모리를 공유할 수 있어 데이터 복사(여기 오타)할 필요가 없습니다. 텐서는 또한 자동미분에 최적화 되어 있습니다. ndarray에 익숙하다면 Tesnor API를 바로 사용할 수 있습니다.
### 초기 호출
import torch
import numpy as np
텐서 초기화
텐서는 여러가지 방법으로 초기화할 수 있습니다. 다음 예를 보세요
1.직접 초기화
data = [[1, 2],[3, 4]]
x_data = torch.tensor(data)
2.Numpy 배열로부터 생성하기
np_array = np.array(data)
x_np = torch.from_numpy(np_array)
3.다른 텐서로부터 생성하기
x_ones = torch.ones_like(x_data) # x_data의 속성을 유지합니다.
print(f"Ones Tensor: \n {x_ones} \n")

x_rand = torch.rand_like(x_data, dtype=torch.float) # x_data의 속성을 덮어씁니다.
print(f"Random Tensor: \n {x_rand} \n")
Ones Tensor:
 tensor([[1, 1],
        [1, 1]])

Random Tensor:
 tensor([[0.8891, 0.4431],
        [0.4129, 0.5990]])
무작위 또는 상수 값을 사용하기
shape은 텐서의 차원을 나타내는 튜플로 아래 함수들에서는 출력 텐서의 차원을 결정합니다.
shape =(2,3,)
rand_tensor = torch.rand(shape)
ones_tensor = torch.ones(shape)
zeros_tensor = torch.zeros(shape)

print(f"Random Tenso:\n {rand_tensor}\n")

print(f"ones_tensor :\n {ones_tensor}\n")

print(f"zeros_tensor:\n {zeros_tensor}\n")
Random Tenso:
 tensor([[0.3407, 0.0224, 0.9115],
        [0.3431, 0.7869, 0.7597]])

ones_tensor :
 tensor([[1., 1., 1.],
        [1., 1., 1.]])

zeros_tensor:
 tensor([[0., 0., 0.],
        [0., 0., 0.]])
텐서의 속성
텐서의 속성은 텐서의 모양 자료형 및 어는 장치에 저장되는지를 나타냅니다.
tensor =torch.rand(3,4)

print(f"Shape of Tensor : {tensor.shape}")
print(f"Datatype of Tensor : {tensor.dtype}")
print(f"Device tensor is stored on: {tensor.device}")
Shape of Tensor : torch.Size([3, 4])
Datatype of Tensor : torch.float32
Device tensor is stored on: cpu
텐서의 연산
전치, 인덱싱,슬라이싱,수학 계산 ,선형 대수 임의 샘플링등 100가지 이상의 연산들을 여기에서 확인 할 수 있습니다.
https://pytorch.org/docs/stable/torch.html
각 연산들은 GPU 에서 실행할 수 있습니다. Colab을 사용한다면 Edit>Notebook Setting에서 GPU를 할당할 수 있습니다
기본적으로 텐서는 CPU에 생성됩니다. .to 메소드를 사용하면 (GPU 사용이 확인한 뒤) GPU로 텐서를 명시적으로 이동할 수 있습니다. 장치들 간에 큰 텐서들을 복사하는 것은 시간과 메모리 측면에서 비용이 많이 든다는것을 기억하세요.
# GPU가 존재하면 텐서를 이동합니다
if torch.cuda.is_available():
    tensor = tensor.to("cuda")
목록에서 몇몇 연산들을 시도해보세요. NumPy API에 익숙하다면 Tensor API를 사용하는 것은 식은 죽 먹기라는 것을 알게 되실 겁니다.
tensor = torch.ones(4,4)
print(f"first Row : {tensor[0]}")
print(f"First column : {tensor[:,0]}]")
print(f"Last Column : {tensor[...,-1]}")
tensor[:,1] = 0
print(tensor)
first Row : tensor([1., 1., 1., 1.])
First column : tensor([1., 1., 1., 1.])]
Last Column : tensor([1., 1., 1., 1.])
tensor([[1., 0., 1., 1.],
        [1., 0., 1., 1.],
        [1., 0., 1., 1.],
        [1., 0., 1., 1.]])
#산술 연산
#두 텐서 간의 행렬 곱 을 계산합니다 y1 y2 y3는 모두 같은 값을 갖습니다
y1 = tensor @tensor.T
y2 = tensor.matmul(tensor.T)
y3 = torch.rand_like(y1)
torch.matmul(tensor, tensor.T, out=y3)


# 요소별 곱(element-wise product)을 계산합니다. z1, z2, z3는 모두 같은 값을 갖습니다.
z1 = tensor * tensor
z2 = tensor.mul(tensor)

z3 = torch.rand_like(tensor)
torch.mul(tensor, tensor, out=z3)
단일-요소(single-element) 텐서 텐서의 모든 값을 하나로 집계(aggregate)하여 요소가 하나인 텐서의 경우, item() 을 사용하여 Python 숫자 값으로 변환할 수 있습니다:
agg = tensor.sum()
agg_item = agg.item()
print(agg_item, type(agg_item))
바꿔치기(in-place) 연산 연산 결과를 피연산자(operand)에 저장하는 연산을 바꿔치기 연산이라고 부르며, _ 접미사를 갖습니다. 예를 들어: x.copy_(y) 나 x.t_() 는 x 를 변경합니다.
print(f"{tensor} \n")
tensor.add_(5)
print(tensor)
Numpy 변환
CPU 상의 텐서와 NumPy 배열은 메모리 공간을 공유하기 때문에, 하나를 변경하면 다른 하나도 변경됩니다.
t = torch.ones(5)
print(f"t: {t}")
n = t.numpy()
print(f"n: {n}")
t.add_(1)
print(f"t: {t}")
print(f"n: {n}")
Numpy 배열을 텐서로 변환
n = np.ones(5)
t = torch.from_numpy(n)
#NumPy 배열의 변경 사항이 텐서에 반영됩니다.
np.add(n, 1, out=n)
print(f"t: {t}")
print(f"n: {n}")
출처
https://tutorials.pytorch.kr/beginner/basics/intro.html
댓글남기기